

Appearance
Bonus Point Encashment
Accessing the Bonus Point
- Navigate to Payroll:
- On the left side menu, click on Payroll.
- Select Encashments & Reimbursements from the dropdown list.
- Switch to the Bonus Encashments tab.
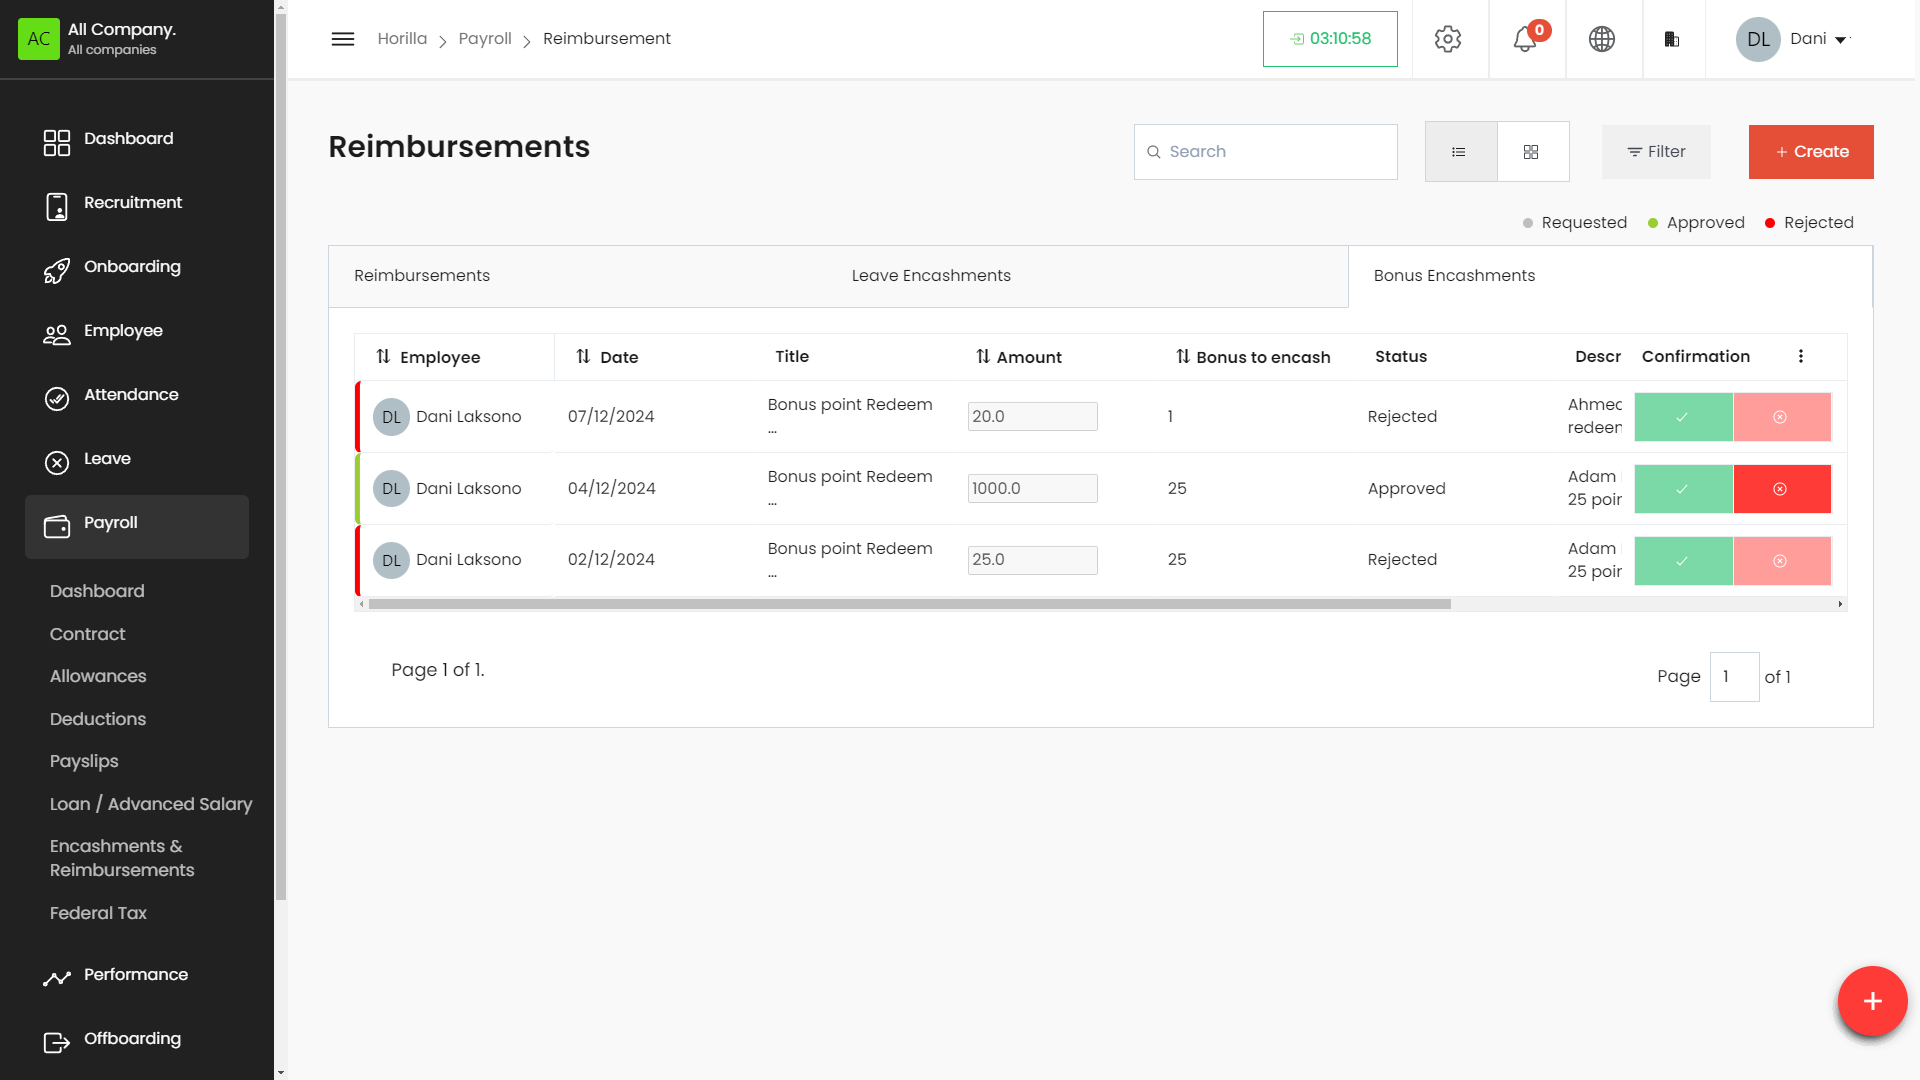
- The Bonus Point Encashment page displays a list of all encashment entries in a table format.
Working with the Bonus Point Encashment Table
The Bonus Point Encashment table provides a detailed view of all defined encashments, with columns for:
- Title: The title or description of the encashment.
- Employee: The employee receiving the encashment.
- Points: The total points being encashed.
- Encashment Amount: The amount received for the encashment.
- Status: Indicates whether the encashment is approved, pending, or rejected.
- Actions: Buttons to view, edit, or delete the encashment entry.
Filtering and Grouping Bonus Point Encashments
- Filter Bonus Point Encashments: Click on the Filter button to narrow down encashments based on specific criteria such as employee, status, or date.
- Group By: Use the Group By feature to organize encashments by categories like status or employee.
Creating a New Bonus Point Encashment
- Click on the + Create button at the top-right corner of the Bonus Point Encashment page.
- Fill in the encashment details:
- Title: Enter the title or description of the encashment.
- Employee: Select the employee receiving the encashment.
- Points: Enter the total points being encashed.
- Encashment Amount: Enter the amount for the encashment.
- Description: Provide a detailed description of the encashment.
- Attachments: Upload any relevant documents.
- Save the encashment by clicking the Save button.
Editing and Deleting Bonus Point Encashments
- To Edit a Bonus Point Encashment: Click the Edit icon next to the encashment in the Actions column. Make the necessary changes and save.
- To Delete a Bonus Point Encashment: Click the Delete icon next to the encashment in the Actions column. Confirm the deletion.
Exporting Bonus Point Encashments
- Go to the Actions menu in the Bonus Point Encashment section.
- Select Export and choose the desired format (e.g., CSV, PDF).
- Download the file to save a copy of the encashment details.
Leave Encashment
Accessing the Leave Encashment Section
- Navigate to Payroll:
- On the left side menu, click on Payroll.
- Select Encashments & Reimbursements from the dropdown list.
- Switch to the Leave Encashments tab.
- The Leave Encashment page displays a list of all encashment entries in a table format.
Working with the Leave Encashment Table
The Leave Encashment table provides a detailed view of all defined encashments, with columns for:
- Employee: The employee requesting the leave encashment.
- Date: Encashment affected payroll date.
- Title: The title of the leave encashment.
- Amount: The amount received for the leave encashment.
- Leave Type: The type of leave being encashed (e.g., Casual Leave, Sick Leave).
- Available Days to Encash: The number of leave days available for encashment.
- Carryforward to Encash: The number of leave days carried forward for encashment.
- Status: Indicates whether the encashment is approved, pending, or rejected.
- Description: Additional details provided for the leave encashment.
- Comment: Remarks or comments regarding the leave encashment.
- Actions: Buttons to view, edit, or delete the encashment entry.
- Confirmation: The approve and reject buttons.
Filtering Leave Encashments
- Filter Leave Encashments: Click on the Filter button to narrow down encashments based on specific criteria such as employee, status, or date.
Creating a New Leave Encashment
- Click on the + Create button:
- Located at the top-right corner of the Leave Encashment page.
- Fill in the leave encashment details:
- Title: Enter the title or description of the leave encashment.
- Type: Select the encashment type, typically Leave Encashment.
- Employee: Select the employee requesting the leave encashment.
- Allowance on: Enter the date of the encashment (e.g., 08/29/2024).
- Leave Type: Select the type of leave being encashed.
- Available Days: Enter the number of leave days available for encashment.
- Carry Forward Days: Enter the number of leave days carried forward for encashment.
- Description: Provide a detailed description of the leave encashment.
- Save:
- Click the Save button to save the leave encashment record.
Editing and Deleting Leave Encashments
- To Edit a Leave Encashment: Click the Edit icon next to the encashment in the Actions column. Make the necessary changes and save.
- To Delete a Leave Encashment: Click the Delete icon next to the encashment in the Actions column. Confirm the deletion.